


In this article, we will be building an editable table with flutter.
 Editable tables are very useful especially in building for Desktops and Larger screen devices. Flutter already has a DataTable widget for building tables, this widget does not allow for editing though it comes with an icon for editing, developers are expected to handle the edit method themselves, however, that is a daunting and undocumented process with no ready to use callbacks to implement.
Hence there is a need for such a package to allow a quick and ready spreadsheet or editable table. I've created a package to do just that which we will be using for this project.
Prerequisite
In other to fully grasp and follow through with this article, the following requirements are necessary:
- Install and setup flutter
- Create a flutter project
For this article, I already have a flutter desktop setup for windows, you don't necessarily need to set up for desktop, thanks to flutter, it's cross-platform compatible.
Step 1: Install Dependencies
We begin by installing the needed dependencies. Editable
- Depend on it
Add this to your package's pubspec.yaml file:
dependencies: editable: ^1.0.8 - Install it
You can install packages from the command line:
with Flutter:
$ flutter pub get
Step 2: Build the table
In your project directory, open the main.dart file,
at the top of the file, import the editable package
import 'package:editable/editable.dart';
You can delete everything else in this file and replace it with
void main() {
  runApp(MyApp());
}

class MyApp extends StatelessWidget {
  // This widget is the root of your application.
  @override
  Widget build(BuildContext context) {
    return MaterialApp(
      title: 'Flutter Editable Table',
      theme: ThemeData(
        primarySwatch: Colors.red,
      ),
      debugShowCheckedModeBanner: false,
      home: TablePage(),
    );
  }
}
All we actually did there is to call a class TablePage(), lets create that class just below the above code, like so:
class TablePage extends StatefulWidget {
  @override
  _TablePageState createState() => _TablePageState();
}

class _TablePageState extends State<TablePage> {

  @override
  Widget build(BuildContext context) {
    return Scaffold(
          body:  Container()
    );
  }
}
Now, we will replace the Container with Editable() widget class from our package like so:
 @override
 Widget build(BuildContext context) {
    return Scaffold(
        body: Editable(
              columns: headers,
              rows: rows,
              showCreateButton: true,
              tdStyle: TextStyle(fontSize: 20),
              showSaveIcon: false,
              borderColor: Colors.grey.shade300,
          ),
      );
  }
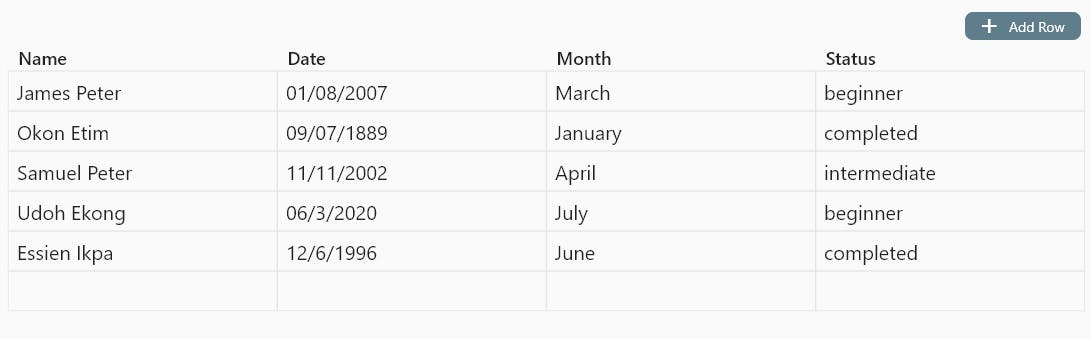
Notice that we referenced two variables headers and rows, there are arrays of objects we will provide to the columns and rows properties to build our table.
Just above the build method, we define our arrays like so:
//row data
List rows = [
            {"name": 'James Peter', "date":'01/08/2007',"month":'March',"status":'beginner'},
            {"name": 'Okon Etim', "date":'09/07/1889',"month":'January',"status":'completed'},
            {"name": 'Samuel Peter', "date":'11/11/2002',"month":'April',"status":'intermediate'},
            {"name": 'Udoh Ekong', "date":'06/3/2020',"month":'July',"status":'beginner'},
            {"name": 'Essien Ikpa', "date":'12/6/1996',"month":'June',"status":'completed'},
          ];
//Headers or Columns
List headers = [
          {"title":'Name', 'index': 1, 'key':'name'},
          {"title":'Date', 'index': 2, 'key':'date'},
          {"title":'Month', 'index': 3, 'key':'month'},
          {"title":'Status', 'index': 4, 'key':'status'},
        ];
now run the app !!!Yupppyyyy
You have an editable table. There are methods you could use to get changes onSubmitted and onRowChanged.
##Step 3: Get Edited Data
To get edited data from a data cell, add the onSubmitted callback. It is an anonymous function of type, ValueChanged. This can be added like so:
  @override
  Widget build(BuildContext context) {
    return Scaffold(
        body: Editable(
              columns: headers,
              rows: rows,
              showCreateButton: true,
              tdStyle: TextStyle(fontSize: 20),
              showSaveIcon: false,
              borderColor: Colors.grey.shade300,
              onSubmitted: (value){ //new line
                print(value); //you can grab this data to store anywhere
              },
          ),
      );
  }
Edit a cell value and hit enter(for desktop users), the value is printed on the console
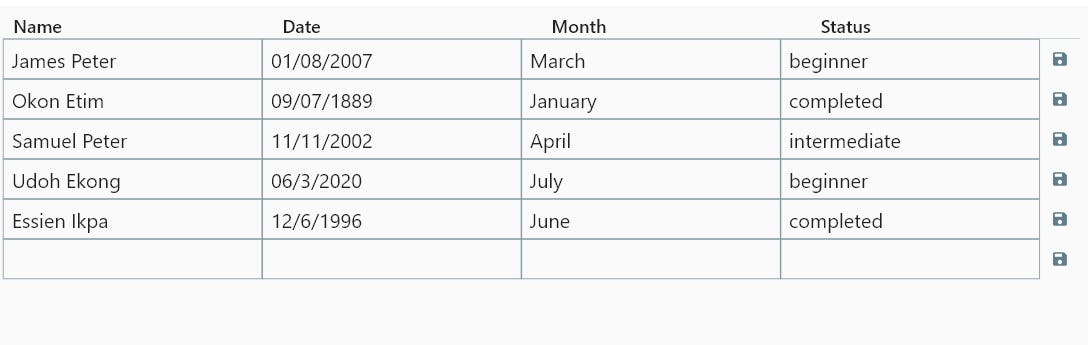
Step 4: Save Edited Rows
To save edited row, set the showSaveIcon property to true.
this will show a save Icon at the right end of each row, you can customize this icon data as you wish.
Add the onRowSaved callback method like so:
  @override
  Widget build(BuildContext context) {
    return Scaffold(
        body: Editable(
              columns: headers,
              rows: rows,
              showCreateButton: true,
              tdStyle: TextStyle(fontSize: 20),
              showSaveIcon: true, //set true
              borderColor: Colors.grey.shade300,
              onSubmitted: (value){
                print(value);
              },
              onRowSaved: (value){ //added line
                print(value); //prints to console
              },
          ),
      );
  }
This method only prints the edited values of the row as an object containing, column key, row id, and value. if not data was edited, it prints no edits.
You can store this data as you wish, perhaps, update your database.
Screenshot
Feel free to ask questions, raise issues, and contribute to the package on git .
Dont forget to like the package on pub.dev
Thank You!